 |
PowerQuest 0.20.3
|
 |
PowerQuest 0.20.3
|
There's now an optional text parser system in PowerQuest, so you can make really old school games like the early Sierra ones where you have to type in commands. I have a soft spot for these, they're strangely immersive, despite the inherit clunkiness, and I hope this inspires people to make some games with it!
To use the parser, create a new project, and select the Text Parser option from the list of templates. (You can add text parser support to existing projects, but it's a bit more involved.)
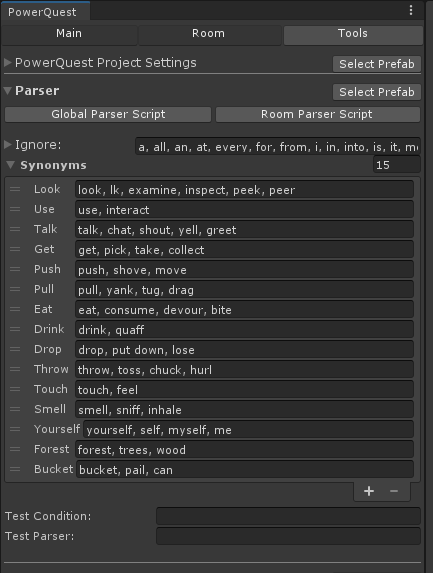
Go to the Parser section under the Tools tab in PowerQuest. It should look something like this:

In that you have:
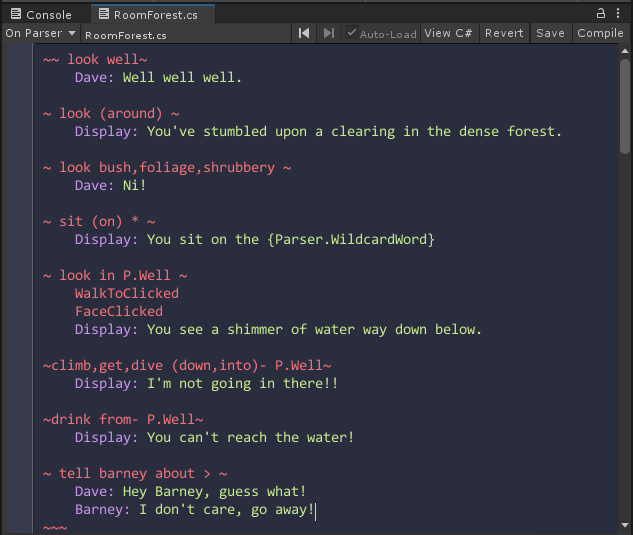
Global Parser Script, and Room Parser Script buttons:OnParser function in the current room or global script+ at the bottom, and type into the list. Type any number of synonyms for each word, separated by a comma or a space.Test Condition and Test Parser fields:Test Condition field, type in the condition you want to test (Eg. "look bucket").Test Parser field. (eg. "examine the pail")The bulk of your parser-game's gameplay will be scripted in OnParser functions in your Rooms and and GlobalScript. They'll end up looking something like this:

There's a lot to unpack here! But it starts nice and simple, I promise!
You can access the IParser class from scripts by typing Parser.. That only contains a few functions, the main ones are Parser.ParseText(string inputText) and Parser.Said(string textToMatch).
Parser.ParseText() tells the parser what the user has typed, and optionally triggers the OnParser functions to be called in your scripts. This is already done in the Parser Gui in the template project, so we won't worry about it for now.
Parser.Said() is the important one, that's what you'll be using the most. Use this to check whether the player's input matches what you want. If it does, it returns true. eg.
if ( Parser.Said("Say Hello" )
{
    Dave: Hello!
}
else if ( Parser.Said("Talk Barney") )
{
    Dave: Hi Barney.
    Barney: Hi!
}
Since you'll have a lot of these, there's a shortcut for the Parser.Said("") bit in the Quest Script editor, using the Tilde charcter ~. eg.
if ( ~Say Hello~ )
{
    Dave: Hello!
}
else if ( ~Talk Barney~ )
{
    Dave: Hi Barney.
    Barney: Hi!
}
And to simplify things even more, you can replace the " if " part with ~~Say Hello~, the "else if", with ~Talk Barney~ and the final closing brace "}" with ~~~. Like so:
~~Say Hello~
    Dave: Hello!

~Talk Barney~
    Dave: Hi Barney.
    Barney: Hi!
~~~
Much more readable!
In some places you'll want to mix and match all three styles, depending how complicated your script is!
Note that if you miss the extra ~~ at the start, or the ~~~ at the end, the script editor will complain about mismatched braces '}', which can be confusing ;)
There's a few special characters you can use in the Said function too~
Optional words
( ) around words that you want to be optional.~look (around)~ will match both "look" and "look around"Alternate words
, to define synonyms when you don't want to add a global synonym to the parser.look bush,shrubbery will match "look bush" and "look shrubbery", etc.if ( ~look bush~ || ~look shrubbery~ )Wildcard Words
* to match any word.~sit on *~ will match "sit on bucket", "sit on well", "sit on barney".Parser.HasWildcard will return true. And Parser.WildcardWord returns it for you to use.Display: You sit on the {Parser.WildcardWord}.Rest of line
> to match the rest of the line.~ tell barney about> ~ matches "tell barney about eels taking over the world", "tell barney about adventure game text parsers", etc.Quest Objects
Parser.Said("drink from", H.Well);~drink from- P.Well~, character.WalkToClicked and FaceClicked, and the character will walk to the correct object.Parser.Target.~look in well~ from ~look well~ even though "in" is an ignored word.OnLookAt function in Barney's script.OnInteract or maybe OnUseInv functions if it makes sense to do so.~get- P.Bucket~
E.HandleInteract(P.Bucket);
E.HandleParser~use well bucket~
Display: You fill the bucket.
~use,fill,lower bucket well~
E.HandleParser("use well bucket");
Parser.OnUnhandledEvent.OnParser function. So you can easily paste the line in.Parser.UnknownWord, if the user typed a word that wasn't in the Ignored or Synonym list, this will be set, so you can tell the user. eg.if ( Parser.HasUnknownWord )
Display: You can't use the word {Parser.UnknownWord} here!
Systems in Tools->PowerQuest.Enable Parser tickbox in Tools->PowerQuestParser.ParseText(). ~look well~, you'll need to add stuff to Tools->Editor Settings. It's probably easiest to copy from another project that uses the template.