Start with the demo project and edit the stuff that’s there, delete things you don’t want.
There’s a million settings in unity for project setup, I won’t document everything, but google’s your friend if you’re searching for a setting.
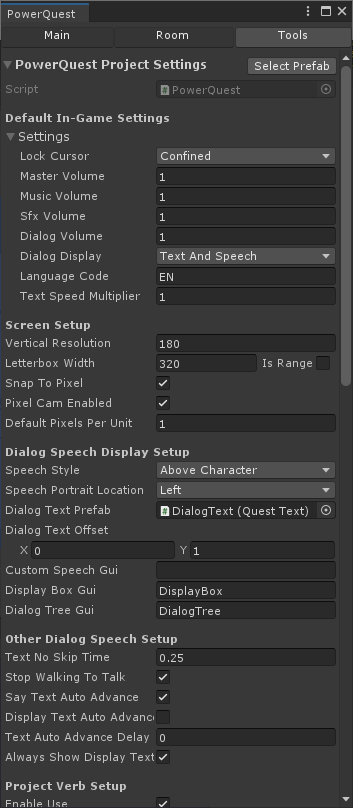
PowerQuest Project Settings
Find these under Tools -> PowerQuest Project Settings
Hover over fields for a description of individual fields do.
Interface Styles
PowerQuest comes with a few built in templates:
One/Two click interface (Beneath a Steel Sky, Wadjet eye style).
HD interface, the same as the above but set up for hi resolution art.
9-verb lucasarts interface.
Text Parser interface.
But you can customize your in-game interface however you want by adding your own guis and change the way mouse clicks are processed in your Global Script (Look for the OnMouseClick function.)
More templates may be added in future, and you can share your own.
To share your own templates:
Select the Game, Audio and Fonts folders in the Project window,
Right click -> Export package.
Make sure you untick "include dependencies" and click Export.
Dialog Style
In PowerQuest Project Settings there’s an option for different dialog styles:
Above Character: LucasArts style dialog visuals, text displayed above the character in the game.
This is the main one supported, (cause that’s what my games use).
Portrait: Displays GuiTextBox at the top of the screen and the Talk anim for the character next to it
Caption: For displaying dialog text at the bottom of the screen. (ie: not above character’s head)
You can add a ScreenAlign component to the DialogText prefab to make it align to the bottom of the screen or wherever you want to put it
Character dialog will display in the color specified in the Character's data.
It's easiest to start with the right template (eg: The HD one for hi-res games). But totally doable to change it later.
To change your intended game resolution:
Under Tools -> PowerQuest Project Settings…
Set the Snap to Pixel option to on if your game is pixel art, otherwise off
Set the Vertical Resolution to be what you want your background height to be (eg: 180, 720, 1080)
You can also override this per-room too in the Room Inspector
Also set the default camera size for previewing the game in the Camera prefab
Go to Tools -> Game Camera-> Select Prefab button, and set the size to HALF your vertical resolution
You can also set the letterbox width here. This controls the minimum and maximum horizontal resolution you'll allow, if you want to letterbox the game to certain aspect ratios (defaults to between 16:9 and 16:10 widths)
Fonts: If you want to use high-res fonts (not pixel art):
Edit the TextMesh component on text. Increase the Font Size (eg: from 10 to 100) and decrease the Character Size (eg, from 10 to 1) to make them not blurry. It takes a bit of fiddling to get the right balance.
Text is used in a few places in PowerQuest, so you’ll need to edit it in the following prefabs (double click them to edit):
DialogText
GuiControls\Button (Text)
GuiControls\Label
GuiControls\Slider
GuiControls\TextField
Room Setup
Basic New Room Setup:
Click the + under Rooms in PowerQuest's Main tab
Give your room a unique name
Select the Room tab in PowerQuest
Add a prop for the background (Call it "Bg" or something)
Either import a sprite and drag it into the SpriteRenderer’s Sprite field,
Or import sprites and create an animation for it (instructions above). Give the animation the same name as your prop, and it will appear automatically.
Setup a walkable area:
Select it, then click Edit Hotspot Shape.
Draw out a "Walkable area" in the Scene window
Right click to cut out holes/obstacles to walk around.
Hit Play to test your character walking around
Or untick “Player Visible” if the player shouldn’t be seen in this room (like the title screen)
Add more Props, Hotspots, Regions, Add interactions, etc etc
Scrolling Rooms
Edit the room bounds (or drag out the yellow box in the scene) to match the width of your background sprite, then the camera will follow your player around
Also set the Scroll bounds to control how quickly the room scrolls right to the edge
There are more settings for controlling camera behavior in the QuestCamera object, found under Tools
You can add Parallax to Props by setting the Parallax Depth in their data (hover for tooltips) and the Parallax Alignment to help line it up on left/right of screen (-1 is left, 1 is right)
If rooms are different sizes, you can override the project’s “Vertical Resolution” (camera height) in each room. - You can override the camera from scripts too to position it to different places manually, and zoom in on things.
To View Characters in the Room:
Drag your Character from the project window into the scene
Note: This is a preview only!
Any changes to Character Data here will not show up in game, unless you "Apply" them to the prefab
Characters also won't show up in the room unless:
They're the main (playable) character
You’ve set their "room" field in their data
or, you’ve set them to move there in your OnEnterRoom function. eg C.Barney.Show(R.MyRoom); or C.Barney.Room = R.MyRoom;.
Particle Systems, Text Mesh, Other Flashy Unity Things:
Adding Particle Systems or Text as a nested object under a prop is recommended, then the Visible propery will control whether you can see them or not.
Props (and characters, etc) are all just GameObjects, so you can do all the normal unity things you want.
Here’s an example of getting your fancy custom unity component that’s on a prop from a PowerQuest script: MyComponent myComponent = Prop(“Door”).Instance.GetComponentInChildren<MyComponent>(); myComponent.DoAmazingThing();
Video Playback
Props can have a video play on them instead of a regular animation
Add a prop and in the inspector, add a VideoPlayer component.
Set the video component up with a video file, and set desire Render Mode (Camera Near, Camera Far, and Material Override can all work)
To play video in script use the PlayVideo functions on the prop. eg: Prop.MyVideoProp.PlayVideo();
Click "Edit Prefab" to set up the character's pivot and collider.
Adjust the Character Pivot until the character's feet line up with the baseline.
Click Edit Hotspot Shape to modify it. (Or untick Clickable if they're not clickable).
You can also tick Use Sprite As Hotspot if you want to automatically set their hotspot from their sprite.
The player character starts as the first one in the list, you can drag others to this spot, or call E.SetPlayer(C.MyCharacter); to change it in scripts.
If you’re editing a character in the scene, you’ll want to hit Overrides-> Apply All so your changes will be remembered across scenes.
Moving a character instance around in the scene won’t change their position in game (like it will for a prop). You’ll have to set the Room and Position in the character's Data.
Alternatively you can use one of Unity’s built in GUI systems, if you’re already used to using them and want the extra complexity. There's a Gui Camera and Canvas to use in each room to preview guis. You can add a powerquest Gui component to your unity guis so that you'll still be able to manage them in PowerQuest.
Next: Check out the PowerQuest API page, which explains the different objects and functions you can use.